How to Erase A Post On Facebook: Erase facebook status upgrade on mobile user interface has been a trouble for many customers. The propensity of making mistakes while typing using your android phone is extremely high, the factor is not as well much from the little keyboard on the phones, car appropriate spellings of some word likewise contribute to this errors.

How to Erase A Post On Facebook
Most of my status updates and image uploads on Facebook are through my Android phone. Previously, whenever I made blunder while updating my status, I had to visit using my laptop to delete the facebook status update. However, simply of recent by mishap, I found the unseen (practically) eliminate button in the Facebook app for Android that allows me to delete status updates right on the mobile user interface.
What I will certainly say is that, I don't know how much time the function has actually been there, yet all I recognize is, it does have the potential to maintain you from embarrassment and to save your time, also stop you from utilizing laptop prior to you could delete facebook status update while you made blunder. So allow us to see exactly how you could erase facebook status upgrade straight from Android interface.
How to Erase Facebook status Update on Mobile User Interface
Using Facebook on Android you can either just conceal the update from your timeline and to remove it entirely. To remove a status upgrade from Android view it on your information feed first. The majority of us would certainly long push the update to find the remove choice, however, that is not the situation here, that is the reason I called it undetectable way.
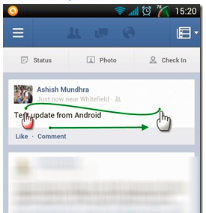
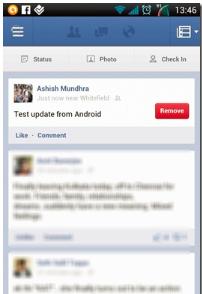
Swipe your thumb from entrusted to precisely the status upgrade you intend to remove to uncover a small Remove switch on the status. Merely push the button to delete facebook status update.
An additional issue is that you might not want to remove facebook status upgrade yet hind it from the timeline. You will certainly have to swipe on the update in the timeline view, after swiping on the timeline view you will certainly see Conceal from Timeline option along with the Erase Post option.

How to Erase A Post On Facebook
Most of my status updates and image uploads on Facebook are through my Android phone. Previously, whenever I made blunder while updating my status, I had to visit using my laptop to delete the facebook status update. However, simply of recent by mishap, I found the unseen (practically) eliminate button in the Facebook app for Android that allows me to delete status updates right on the mobile user interface.
What I will certainly say is that, I don't know how much time the function has actually been there, yet all I recognize is, it does have the potential to maintain you from embarrassment and to save your time, also stop you from utilizing laptop prior to you could delete facebook status update while you made blunder. So allow us to see exactly how you could erase facebook status upgrade straight from Android interface.
How to Erase Facebook status Update on Mobile User Interface
Using Facebook on Android you can either just conceal the update from your timeline and to remove it entirely. To remove a status upgrade from Android view it on your information feed first. The majority of us would certainly long push the update to find the remove choice, however, that is not the situation here, that is the reason I called it undetectable way.
Swipe your thumb from entrusted to precisely the status upgrade you intend to remove to uncover a small Remove switch on the status. Merely push the button to delete facebook status update.
An additional issue is that you might not want to remove facebook status upgrade yet hind it from the timeline. You will certainly have to swipe on the update in the timeline view, after swiping on the timeline view you will certainly see Conceal from Timeline option along with the Erase Post option.
Comments
Post a Comment